Install Netopeer2 on Ubuntu 20.04
sudo apt-get update
sudo apt-get install git cmake build-essential bison flex libpcre3-dev libev-dev libavl-dev libprotobuf-c-dev protobuf-c-compiler swig python-dev lua5.2 pkg-config libpcre++-dev openssl libssl-dev libcrypto++-dev zlib1g-dev
* Install libssh 0.8.6 since the system installed libssh0.9.3 won't work with Netopeer2
Install libssh 0.8.6
wget https://git.libssh.org/projects/libssh.git/snapshot/libssh-0.8.6.tar.gz
tar -xf libssh-0.8.6.tar.gz
rm libssh-0.8.6.tar.gz
cd libssh-0.8.6
mkdir build && cd build
cmake ..
make
sudo make install
On Ubuntu, become root:
sudo -i
#mkdir NetConfServer
#cd NetConfServer
1 Install libyang
#git clone https://github.com/CESNET/libyang.git
#cd libyang
#mkdir build && cd build && cmake .. && make && make install
2 Install sysrepo
#cd ..
#git clone https://github.com/sysrepo/sysrepo.git
#cd sysrepo
#mkdir build && cd build && cmake .. && make && make install
3 Install libnetconf2
#cd ..
#git clone https://github.com/CESNET/libnetconf2.git
#cd libnetconf2
#mkdir build && cd build && cmake .. && make && make install
4 Install Netopeer2
#cd ..
#git clone https://github.com/CESNET/netopeer2.git
#cd netopeer2
#mkdir build && cd build && cmake .. && make && make install
To ensure that all libraries that have been installed are now available, execute:
#ldconfig
Testing
The simplest check to see if netopeer2-server installed correctly is to run it with the -h (help) option:
# netopeer2-server -h
Usage: netopeer2-server [-dhV] [-v level] [-c category]
-d debug mode (do not daemonize and print
verbose messages to stderr instead of syslog)
-h display help
-V show program version
-v level verbose output level:
0 - errors
1 - errors and warnings
2 - errors, warnings and verbose messages
-c category[,category]* verbose debug level, print only these debug message categories
categories: DICT, YANG, YIN, XPATH, DIFF, MSG, EDIT_CONFIG, SSH, SYSREPO
You should confirm that sysrepo is installed and runnable:
# sysrepoctl -l
Sysrepo schema directory: /etc/sysrepo/yang/
Sysrepo data directory: /etc/sysrepo/data/
(Do not alter contents of these directories manually)
List of Module Names
Start netopeer processes:
# netopeer2-server
You may want to start netopeer2-server in debug mode:
# netopeer2-server -d -v3
$ netopeer2-cli
> connect
Interactive SSH Authentication
Type your password:
Password:
>
Shell
and also check the running configuration:
> get-config --source running
Connect to netopeer server from NETCONFc
Start NETCONFc, click the 'Connect SSH' toolbar button, enter server’s host name or IP address, port number, user name and password. By default you should be able to use any SSH user configured in your Ubunto box to connect to it. Later you can enable NACM settings to restrict access.
Then click the button “Connect” on the session creation dialog. You should be connected to the server. If error happens, check if the server is running on the specified address and port. Also make sure the correct user name and password are used. See more in troubleshooting section.
For details on how to create a session from NETCONFc and browse default modules on netopeer server, see NETCONFc's menu Help->Help Topics ->First steps with NETCONFc
Enabling Write access since it is denied by default
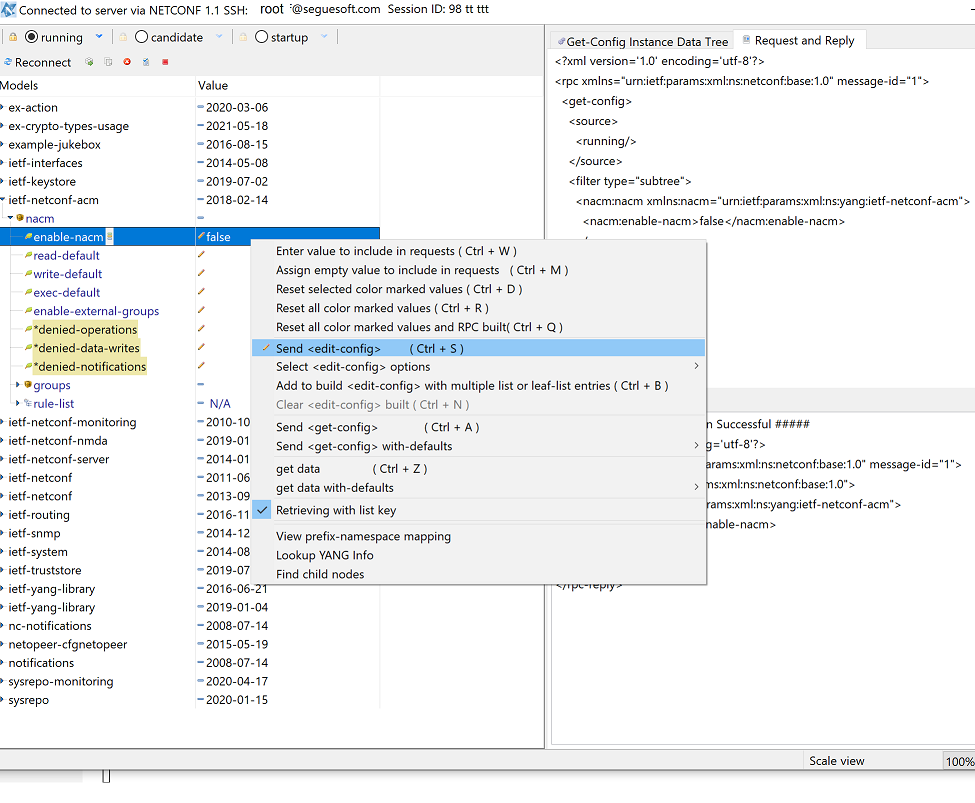
This NETCONF server implements full ietf-netconf-acm access control that bypasses sysrepo file system access control. NACM is enabled by default, so users other than root will not be allowed to write any data but should be granted read and execute permissions unless the access was modified by a NACM extension. When deploying this server, it is strongly advised to configure NACM properly.
You can use SSH root user to connect to the server, and issue an <edit-config> to disable NCAM for developing and testing.
Enabling TLS with example certs and keys
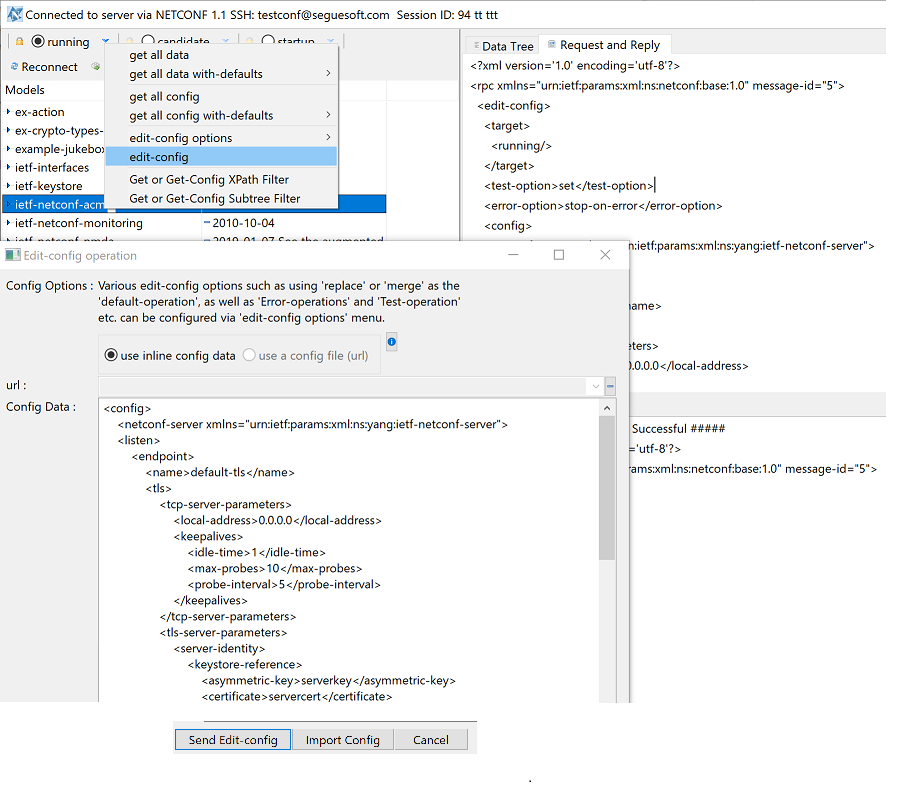
To support clients connecting using TLS, configuration files tls_keystore.xml, tls_truststore.xml, and tls_listen.xml needs to be merged into sysrepo configuration of modules ietf-keystore, ietf-truststore, and ietf-netconf-server, respectively.
After doing so, NETCONFc client can connect using client.crt certificate and client.key private key and having ca.pem CA certificate set as trusted. These example certificates can be found in NetConfServer/example_configuration/tls_certs. Once connected, the client will be identified with tls-test NETCONF username.
Use NETCONFc to send <edit-config> to merge the above mentioned XML config into the server's <running> config store. You can click "Import Config" button to import the XML config file and then click "Send Edit-config" to send to the server.
SSH Call Home
To enable SSH Call Home, only ssh_callhome.xml file needs to be imported to sysrepo provided that the default SSH host key genkey was imported into ietf-keystore configuration. If you have enabled TLS listener then this has been taken care of.
It is easy NETCONFc to send <edit-config> to merge the above mentioned XML config into the server's <running> config store.
TLS Call Home
Using the same certificates and authorization options, a TLS client can be connected to using Call Home when tls_callhome.xml file is imported. Note TLS needs to enabled first.
It is easy to use NETCONFc to send <edit-config> to merge the above mentioned XML config into the server's <running> config store.
Using sysrepocfg command to enable accessing Netopeer2 using TLS and Callhome example:
To support clients connecting using TLS, the following configuration files found in example_configuration on the running containe rneed to be merged into sysrepo configuration:
$cd netpeer2/example_configuration
$ ls
ssh_callhome.xml
tls_callhome.xml
tls_certs
tls_keystore.xml
tls_listen.xml
tls_truststore.xml
After doing so, a NETCONF client can connect with the example client certificate client.crt, client private key client.key and CA certificate ca.pem in tls_certs directory set as trusted.
We can use sysrepo’s sysrepocfg command to do this. Place the following commands into a script file enable_tls.sh:
# sysrepocfg --edit=tls_keystore.xml --format=xml --datastore=running --module=ietf-keystore
# sysrepocfg --edit=tls_truststore.xml --format=xml --datastore=running --module=ietf-truststore
# sysrepocfg --edit=tls_listen.xml --format=xml --datastore=running --module=ietf-netconf-server
# sysrepocfg --edit=ssh_callhome.xml --format=xml --datastore=running --module=ietf-netconf-server
# sysrepocfg --edit=tls_callhome.xml --format=xml --datastore=running --module=ietf-netconf-server
# Since we merged the configuration we must copy it to the startup config store so it won't get lost
# sysrepocfg --copy-from=running --datastore=startup
or just importing them (note this will overwrite any existing configuration. That is only TLS may be listening)
# sysrepocfg --import=tls_keystore.xml
# sysrepocfg --import=tls_truststore.xml
# sysrepocfg --import=tls_listen.xml